
Unpacking retail fixtures should follow the supplier’s opening sequence, with the receiving area prepared and each packaging layer photographed before it is removed. Identify the unit, check the outer protection, expose finishes gradually, and stop when damage or unstable packing makes further handling uncertain. Keep the packaging associated with the correct cabinet until the inspection and any supplier review are complete. This sequence helps distinguish a delivery discrepancy from damage that might occur during installation. It is a receiving and finish-inspection checklist, not a lifting plan, an electrical commissioning procedure, or a statement about freight claim rights. Confirm the actual packaging design, handling instructions, and contractual reporting process before delivery.
Agree on the unpacking instructions before the truck arrives
Ask for the packing list, fixture references, package identification, and instructions for opening each package. A crate, a wrapped assembled counter, and a flat-packed shelving unit may require different procedures. Find out which pieces are loose, which components are restrained for transit, and whether the supplier expects a trained installer to remove particular supports. Do not assume that a visible strap is only disposable wrapping.
Request an explanation of where the fixture is supported and which parts must never be used as lifting points. Glass edges, decorative rails, shelves, handles, and signage are not automatically suitable for carrying a cabinet. If the supplied information is unclear, resolve it while the unit remains supported and protected. A product rendering can identify visible parts, but it cannot establish mass, center of gravity, or lifting capacity.
For broader choices between counter and cabinet formats, see our specialty retail display cabinet guide. Keep that selection decision separate from the package-specific instructions needed at delivery. For a retail counter project, request the receiving documents with the order rather than after unloading.
Prepare a receiving area that protects the fixture and the people
Choose a dry, adequately lit space where the package can be inspected without blocking customers, exits, or working routes. Clear a place for removed protection and a separate place for small components. Check the route from unloading to the receiving area before accepting a plan that requires repeated movements. The appropriate personnel, equipment, and method depend on the actual load and site.
The UK Health and Safety Executive’s manual handling guidance explains the importance of avoiding hazardous handling where practicable, assessing unavoidable tasks, and reducing risk. Apply the relevant local requirements and a competent site assessment. Do not turn a general checklist into a recommended team size or a weight limit for an unverified cabinet.
Keep dust-producing construction and sharp offcuts away from exposed finishes. Agree who directs the opening, who records the inspection, and who contacts the supplier. Assigning those responsibilities helps prevent several people from removing different parts of the packaging before anyone has recorded the original condition.
Identify the package and photograph it before opening
Match the package label to the packing list and the approved fixture reference. Record the delivery date, package identifier, expected contents, and the person carrying out the check. Photograph the package from enough viewpoints to show its overall condition and any visible damage. Include a readable identifier in the record so photographs from several similar units cannot be confused.
Look for visible crushing, punctures, wet areas, displaced protection, or a package that no longer sits as expected. Describe what you can actually observe. A torn carton does not prove that the cabinet is damaged, and an intact carton does not prove that its contents are sound. Avoid diagnosing the cause from a photograph alone.
Check the agreed delivery procedure before signing or making any statement about acceptance. Carrier and supplier requirements vary. This article does not prescribe a universal claim deadline or wording. If the delivery arrangement leaves insufficient time for a safe inspection, document the limitation and contact the designated person rather than rushing the opening.
Remove protection in controlled stages
Follow the supplier’s sequence for covers, fasteners, straps, braces, and internal protection. Before releasing a restraint, establish what it holds and whether releasing it can allow movement. Stop if a panel appears to be supporting another part, loose glass is present, or the package has shifted. Have the supplier or qualified installer resolve the uncertainty before proceeding.
Keep cutting tools away from the fixture surface and use the opening method specified for the package. Do not push a blade blindly through a wrapped face. When a fastener or stapled panel is removed, place it directly in the designated waste area. Dragging discarded protection across a counter can transfer grit or expose the finish to sharp debris.
Photograph each meaningful stage, including protection around vulnerable corners and any discrepancy as it becomes visible. The National Park Service handling, packing, and shipping chapter treats unpacking as an operation that deserves the same care as packing. Museum material specifications are not retail cabinet specifications; the transferable principle here is to understand the protection and its opening sequence before disturbing it.
Inspect each exposed surface before moving to the next stage
Check exposed faces under ordinary, useful lighting. Record the location and appearance of scratches, chips, dents, gaps, staining, or loose parts without attempting a cosmetic repair. Include an overall view and a closer view that relates the observation to a recognizable part of the fixture. An unexplained close-up is difficult to match to a large delivery later.
Use the approved drawing and finish sample where available. Distinguish protective film from the final surface, and obtain the supplier’s removal instructions before peeling an unfamiliar film. Do not use solvents, abrasive pads, heat, or improvised cleaners to investigate a mark. A premature cleaning attempt can change the evidence or damage a finish that needs a specific care method.

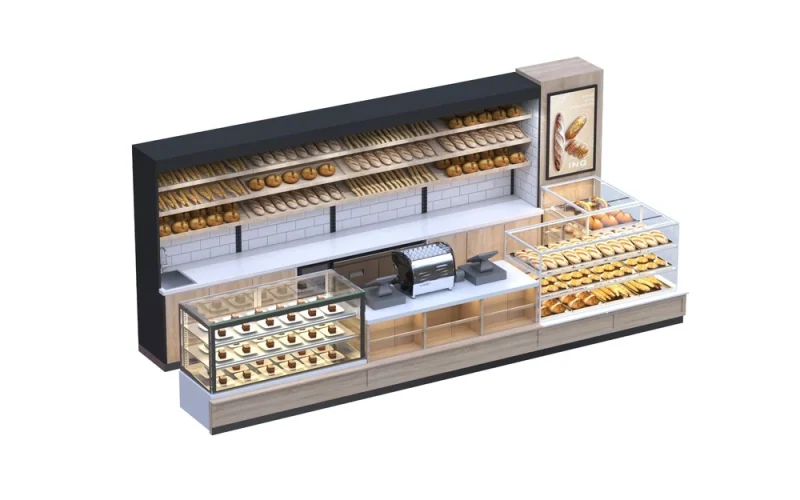
For a long run such as this bakery display, use the drawing references to distinguish the customer face, ends, countertop, glazing, and adjoining units. Do not assume that every visible join is a transport split. The manufacturer must identify actual module boundaries and assembly responsibilities.
Use a receiving record that leads to a clear next action
A practical record connects an observation with a package, a fixture, supporting evidence, and an owner. The following qualitative checklist contains no acceptance tolerances or performance limits. Agree those separately against the order and the supplied instructions.
| Aşama | Kaydedilecek Bilgi | Next action |
|---|---|---|
| Package identity | Label, packing-list reference, expected fixture | Resolve any mismatch before mixing contents |
| Outer condition | Overall photographs and visible damage | Follow the agreed reporting procedure |
| Opening sequence | Protection removed and instructions followed | Stop if support or restraint is uncertain |
| Exposed finish | Part reference, observation, overview and detail | Request supplier assessment before repair |
| Loose components | Item identity, quantity, package location | Reconcile against the supplied list |
| Inspection outcome | Checked, unresolved, or awaiting specialist work | Name the responsible person and follow-up |
Avoid a single unchecked “all good” entry for a multi-package delivery. If a surface remains covered or inaccessible, say so. Recording the limit is more useful than implying that the entire unit was inspected. Keep the receiving check separate from later installation and operational acceptance.
Keep accessories, packaging, and discrepancies together
Reconcile loose shelves, fittings, documents, and other supplied parts with the actual packing list. Store small items in labeled containers associated with the fixture reference. Do not mix similar-looking fittings from different packages or install a substitute simply because it appears to fit. The supplied instructions determine compatibility.
Retain the relevant protection until the supplier confirms what is needed for a discrepancy review or possible return. Keep wet or contaminated material away from exposed furniture and follow the site’s safe storage and waste procedures. Do not leave protruding fasteners, unsupported panels, or discarded wrapping in a walking route while waiting for a decision.
When an issue is found, provide the fixture reference, package reference, photographs in sequence, and a factual description. Ask for the next authorized step and record the response. Do not repeatedly open, rewrap, move, or test a damaged unit just to create more photographs. Additional handling can introduce further uncertainty.
Hand over to installation without losing the receiving evidence
Before the installer takes over, identify which packages were opened, which areas were inspected, which protection remains, and which observations are unresolved. Confirm who is authorized to remove remaining supports or films. If installation must wait, agree suitable storage and protection with the supplier rather than inventing a universal temperature, stacking, or storage-duration rule.

Bizim retail fixture site-survey article covers recording installation conditions, while the lighting service-access checklist addresses later maintenance access. Neither replaces a package-opening instruction. For a concrete example of mixed glass and cabinet faces, review the wood-finish bakery counter product with its supplier; confirm the actual materials, module arrangement, and delivery method for your order.
Further learning: planning movement of a heavy object
The British Museum collections-skills film below demonstrates professional planning and communication when handling heavy objects. Collections Trust identifies the museum as its author and publisher. The setting differs from retail delivery, but the planning discussion supports the need to understand an object and its route before moving it. It is supplementary education, not approval of a cabinet lifting technique, a team size, or equipment for your site.
Watch the heavy object handling film on YouTube. ürününü inceleyin. Bu Collections Trust film listing confirms its educational source.
Sıkça Sorulan Sorular
Should every layer of packaging be removed immediately?
No. Follow the supplier’s sequence and establish what each restraint or support does before releasing it. Leave uncertain protection in place and obtain instructions. Document areas that remain covered instead of calling them fully inspected.
Can a product photograph tell us how to lift a cabinet?
No. A photograph can help identify visible components but cannot establish weight, balance, lifting points, or suitable equipment. Use the supplied handling information and a competent assessment of the actual load and route.
What photographs are useful when a mark is found?
Record the package identity, the overall fixture, the affected component, and a closer view of the observation. Keep the photographs in opening order and describe what is visible without assuming when or how the mark occurred.
Should a scratch be polished before reporting it?
Do not attempt an improvised repair or cleaning treatment. Record the condition and request the supplier’s assessment. Surface treatments can change both the finish and the evidence needed to understand the discrepancy.
Does receiving inspection complete installation acceptance?
No. Record the scope and limits of the receiving check, then hand unresolved items to the responsible installer or supplier. Assembly, anchoring, electrical work, operation, and other commissioning checks require their own applicable instructions and acceptance process.










 Turkish
 English
 German
 Arabic
 French
 Spanish
 Italian
 Russian
 Portuguese
 Japanese