
Clothing rack hanger clearance measurement should use the actual hanger, representative garments, and the rack’s proposed surroundings. Measure from a clearly identified rail reference, then test the space needed to slide, turn, lift, remove, and return a garment. An empty hanger fitting between two uprights does not show that a sleeved coat can be browsed comfortably. Before production, agree the tested arrangement with the fixture supplier and record the hanger, garment, neighboring shelf or rail, and drawing revision. There is no single clearance that suits every retail rack. This guide explains a repeatable fit check without prescribing universal dimensions, structural loads, or accessibility approval.
Separate three different kinds of space
Start by distinguishing the hanger’s physical outline, the garment’s occupied space, and the space used during removal. The first is easy to measure on a table. The second changes with sleeves, shoulders, fabric, and how an item hangs. The third depends on the hook shape, rail position, and the direction in which a shopper naturally takes the garment.
A drawing that shows only the overall rack width can miss all three. Uprights, brackets, end stops, shelves, and adjoining displays reduce usable space. Ask the supplier to identify the usable hanging area and the nearest obstructions rather than treat the outside footprint as a browsing envelope.
For choosing between wall systems, straight rails, and other formats, use our clothing store fixture buying guide. The task here begins after a likely format has been chosen: proving that its proposed arrangement works with your merchandise.
Build a representative hanger and garment set
Bring the hangers intended for opening day, including any wider shoulder forms, trouser clips, size markers, and security attachments. Identify each type with a simple reference. Measure its widest point, overall height, hook opening, and the distance from the hook’s seating point to the hanger shoulder. Record the measurement units and photograph the hanger beside the reference.
Choose garments that challenge different spaces: a wide-sleeved item, bulky outerwear, a long dress or coat, and any clipped garment that hangs unusually low. Include the largest relevant size rather than test only a narrow sample. Put each garment on its intended hanger and let it hang naturally before measuring.
Le Canadian Conservation Institute’s guidance on hanging costumes explains why garment condition, construction, and hanger support matter. It concerns museum collections, not retail spacing rules. Its useful lesson for this test is to choose a suitable support and check the actual garment rather than assume every textile behaves alike.
Define the reference points on the drawing
Agree which line represents the rail center and which surface limits the space. A dimension to a wall is different from a dimension to the front of a shelf bracket. If a back panel, sloping wall, or projecting fitting lies closer to the clothes, show that obstruction explicitly. Take photographs from the side as well as the front.
Record both horizontal and vertical relationships. A rail may provide enough shoulder room while leaving a long hem against a shelf. A high shelf can also obstruct the hook during lifting, even though the garment hangs freely at rest. Identify rail-to-shelf, rail-to-base, and rail-to-neighbor relationships separately.
Use the same references in your clothing store fixture brief and the supplier’s marked drawing. If a dimension changes, state which reference moved. “Add more room” is difficult to verify; a revised obstruction position and repeated sample test provide a clearer decision.
Check the hook against the actual hanging member
Confirm what the hanger hook will rest on. Round rods, square members, and specialized hanging arms can behave differently. A product photograph showing a horizontal tube does not establish that every hook can seat, slide, or rotate on it. Ask the supplier which member is intended for hanging and test the proposed hanger on a representative sample.
Seat the hook normally, move it along the usable length, and observe end stops, joints, brackets, and changes in section. Check whether the hook catches, tilts unexpectedly, or needs to be forced into place. Do not bend a hook or alter the rack to make the sample pass. Refer any mismatch to the supplier before approving production.

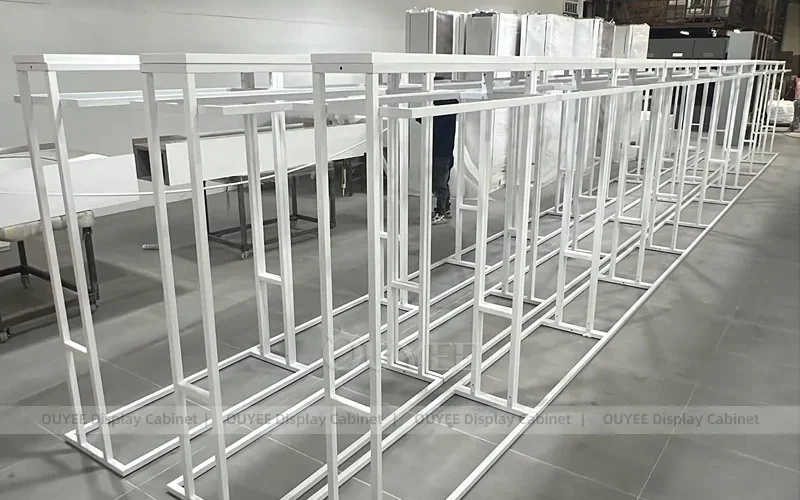
Le white square-tube garment rack collection provides a visible example of repeated frames. Request the actual order’s dimensions and designated hanging surfaces; the photograph is not a clearance test or an approval for a particular hanger.
Test depth with the garment hanging naturally
Set up the proposed rail position against a representative wall or marked mock-up. Hang the selected garment and check the nearest rear obstruction at the shoulders, sleeves, and hem. Then check the front projection. A wide sleeve can extend farther than the hanger, while an open coat can occupy a different outline from a fastened one.
Move the hanger through the intended browsing motion. Observe contact with the wall, neighboring stock, display panels, or a shelf edge. Record whether contact occurs at rest, during turning, or only during removal. These are different findings and may require different changes.
When testing near a wall, use the actual garment rather than simply divide hanger width in half. That shortcut ignores offset hooks, garment thickness, and turning. Domestic closet measurements found online describe particular storage arrangements; they do not approve the depth of your retail fixture.
Measure lift-out space beneath shelves and upper rails
Removing a hanger usually involves raising the hook before moving it away from its support. Test that complete movement beneath any shelf or upper hanging level. Watch the hook’s highest point and the garment’s shoulder area. If the shopper must twist sharply or compress the garment, note the interference instead of declaring success because removal is technically possible.
For two-level hanging, repeat the test with both levels stocked. Check whether lower garments touch the base and whether an upper garment catches the lower stock. Record the selected garment mix for each level. Changing a short-shirt display to long coats later can invalidate the original fit check.
Le U.S. National Park Service’s padded-hanger guidance discusses matching support to garment shape and avoiding contact between a garment and its hanging bar. This is conservation advice; it supports careful observation of contact points, not a universal retail rack dimension.

Repeat the check with neighboring stock
An isolated garment can pass while a stocked rack fails. Arrange the proposed merchandise mix along the rail and test a piece from the middle and near each end. Move adjacent hangers aside, remove the selected item, and return it without forcing the stock. Include the size markers or tags used in normal operation.
For parallel rails, corner arrangements, or face-out arms, test both displays together. Sleeves can meet across the gap even when the empty fixtures remain separate. Record the loaded outline from above and from the customer’s approach. Keep the fixture’s structural loading requirements separate: a comfortable browsing test does not establish a safe load.
Notre boutique rack comparison guide covers choosing formats. Use this sample test to validate the chosen combination rather than change the merchandise density solely to match a catalogue capacity claim.
Keep a short clearance test record
Use the following qualitative checklist for each proposed arrangement. Fill in actual measurements from your sample and drawing; the table intentionally supplies no standard clearance values. Record a photograph or drawing reference for every issue so the supplier can reproduce it.
| Vérification | What to record | Raison de réviser |
|---|---|---|
| Hook and hanging member | Hanger reference, member shape, seating and sliding result | Hook catches, forces open, or cannot seat normally |
| Rear and front depth | Rail reference, nearest obstruction, loaded garment outline | Sleeves or shoulders rub during normal browsing |
| Lift-out movement | Hook path, shelf underside, removal direction | Hook or garment strikes the shelf or upper stock |
| Vertical garment space | Selected garment and hanger, hem position, lower obstruction | Hem rests on a base or interferes with another level |
| Neighboring displays | Both stocked outlines and approach direction | Garments overlap or removal disturbs the other display |
| Approval and repeat test | Drawing revision, sample references, reviewer and date | Production or merchandise changes invalidate the trial |
Describe failures in observable terms: “coat sleeve touches the rear panel during turning” is more useful than “rack feels small.” Ask the supplier to propose a revised arrangement, repeat the same trial, and keep both records. A pass should identify the tested configuration rather than promise compatibility with every future garment.
Check the loaded footprint in the store
Place the approved loaded outline on the store layout, including projecting sleeves and bases. Keep the browsing envelope separate from the circulation space that the project must provide. A rack that works internally can still sit too close to another fixture or an approach route.
Le U.S. Access Board’s accessible-route guide explains the relevant U.S. framework. Have the responsible designer check applicable requirements for the actual location. This article’s garment-fit trial is not an accessibility assessment, and a catalogue footprint alone cannot establish compliance.
Before installation, reconcile the tested arrangement with the recorded site conditions. Keep clearance approval, site measurements, and the supplier’s fixing or load documentation as separate records that describe the same final drawing revision.
Further learning: protecting textiles during handling
The National Museum of African American History and Culture’s educational video, DIY: Preserving Clothing and Textiles, introduces textile care through collections specialist Dr. Reneé S. Anderson. It adds context for handling samples thoughtfully during a fit check. The museum’s preservation advice does not specify retail rack spacing or replace a garment supplier’s care instructions.
Watch the NMAAHC textile-preservation video on YouTube si le lecteur intégré n'est pas disponible.
Questions fréquemment posées
Is there one standard hanger clearance for every clothing rack?
No. Hook shape, hanger width, garment bulk, shelves, and neighboring displays change the space needed. Test representative garments on the intended support and record the approved arrangement instead of applying a universal number.
Can I approve the rack using an empty hanger?
An empty hanger can reveal an obvious hook mismatch, but it does not test sleeves, hems, bulk, or normal browsing. Repeat the trial with representative stock and adjacent garments before production approval.
How should I check a rack beneath a shelf?
Test the complete lift-out and return movement, including the hook’s highest position and the garment shoulders. Record contact with the shelf or surrounding stock and retest any revised arrangement.
Does a successful fit test confirm the rack’s load capacity?
No. Garment clearance and structural capacity are separate checks. Obtain the supplier’s documentation for the actual configuration and have the appropriate project professionals review installation requirements.
When should I repeat the clearance test?
Repeat it when the hanger, garment mix, rail position, shelf arrangement, or neighboring display changes materially. Keep the sample references and drawing revision so the new result can be compared with the previous approval.






 French
 English
 German
 Arabic
 Spanish
 Italian
 Russian
 Turkish
 Portuguese
 Japanese