
Designing a small jewelry shop is a unique challenge. You need to make a space that feels fancy, safe, and welcoming. And you have to do this in a small area. How do you make every square foot count? The answer is in a powerful planning tool: the Jewelry Shop 3D Layout. This is more than just a drawing. It is your plan for success. It lets you build your store on a computer before you spend any money on real construction. This guide will show you how to design small stores. You’ll learn how to create a 3D layout. You’ll also learn how to pick the right people for the job.

Key Takeaways
- A Jewelry Shop 3D Layout is a key tool for seeing your space. It helps you avoid costly mistakes and get the best return on your money.
- Small shops can use smart layouts like Gallery, Island, or Boutique-Zoned plans. These help customers move better and make the space feel bigger.
- The 3D design process has five key steps: Discovery, 2D Planning, 3D Modeling, Detailing, and Rendering.
- Important parts to perfect in your 3D model include display cases, lighting, colors, customer flow, branding, and security.
- You can pick between DIY software for lower costs or hiring a pro firm for skill and a polished result.
Why a 3D Layout is Your Most Powerful Tool
Before you start building, you need a plan. For a jewelry store, a Jewelry Shop 3D Layout is the most important plan you can have. It turns your ideas into a visual model you can explore. This step is key for making smart choices. It helps make sure your shop becomes a success.
Visualize Before You Build
A 3D layout lets you “walk through” your store before it exists. You can test the customer’s path from the door to the displays. You can check sight lines to make sure your most valuable pieces are visible and secure.
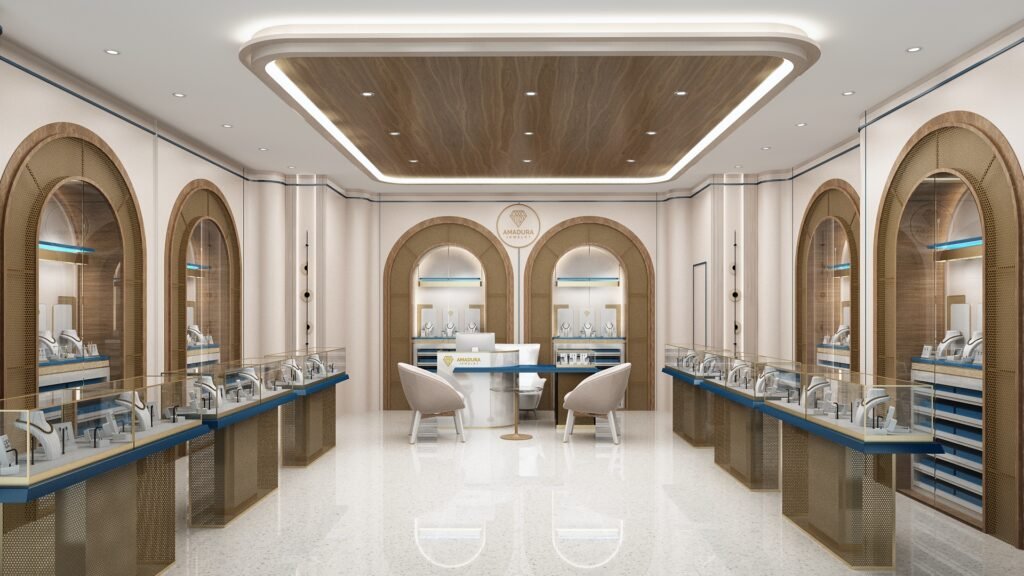
This process gives you confidence in your choices. Seeing a realistic model helps you see exactly how the final space will look and feel. Like in a 3D interior rendering of a modish jewelry boutique, you can see the finished result. It removes the guesswork from the design process.
Get More Return and Avoid Mistakes
Changes during construction cost a lot. A 3D model helps you find problems early. Is a display case too big? Is the lighting in the wrong spot? Finding these flaws in a digital model can save you thousands of dollars.
A well-designed store layout is not just about looks. It affects sales. Studies show that a great layout can increase sales by 20-30%. It does this by making products more visible. It also helps customers move around easier. A detailed Jewelry Shop 3D Layout is your first step toward achieving this.
A Blueprint for Everyone
Your 3D layout is a universal language. It clearly shows your vision to everyone involved in the project. Your contractor knows where to build walls. Your electrician knows where to place outlets and lights.
Even your marketing team can use the 3D images. They can create excitement and show off your beautiful new store before it opens. This single document makes sure everyone is working from the same plan. This prevents confusion and delays.
Making Every Inch Count: 4 Smart Layouts
The right floor plan is key for a small jewelry shop. It affects how customers move. It affects how secure your products are. It affects how big the space feels. A thoughtful Jewelry Shop 3D Layout makes the most of every inch. Here are four smart layouts perfect for smaller spaces.

The Gallery Layout
This layout places display cases along the walls. It creates a central walkway for customers. It feels like walking through a fine art gallery.
- Best for: Long, narrow spaces. It uses wall space very well.
- Pros: Creates a clear path for customers. Keeps the middle of the room open. This makes it feel less cramped.
- Cons: Can feel a bit formal. May limit direct interaction between staff and customers.
- Tip: Place a large mirror on one of the long walls. This simple trick creates an illusion of width. It makes the entire shop feel bigger.
The Island Layout
This popular layout has a central cluster of display islands or counters. Customers can walk around the entire edge of the store.
- Best for: Square-shaped rooms or spaces with a central entrance.
- Pros: Encourages customers to browse and explore from all angles. The central island is a natural focal point.
- Cons: Needs enough width to ensure comfortable aisles around the central displays.
- Tip: Use the central island for your checkout system. Put your most eye-catching pieces here. This makes transactions smooth and draws immediate attention.
The Boutique-Zoned Layout
This strategy divides your small shop into distinct “zones” or mini-sections. For example, you might have a bridal zone, a fashion jewelry zone, and a high-value collections zone.
- Best for: Creating a high-end, curated experience. It makes a small space feel like a collection of exclusive boutiques.
- Pros: Guides customers on a journey of discovery. Lets you create different moods within one store.
- Cons: Can feel cluttered if the zones are not clearly defined. Also if there are too many zones.
- Tip: Use subtle changes in lighting, flooring, or wall color to signal a new zone. This helps define the areas without building physical walls.
The Corner-Anchored Layout
This layout takes advantage of corners, which are often underused. A high-impact display, a consultation desk, or comfortable seating can be placed in a corner. This anchors the design.
- Best for: Shops with irregular shapes or a corner entrance.
- Pros: Turns awkward corners into functional, attractive features. Can create a cozy and private area for customer consultations.
- Cons: May need custom-built furniture to fit the corner perfectly.
- Tip: A corner consultation nook with comfortable chairs makes customers feel valued. It gives them a private space to make important purchase decisions.
The 5-Step Process to a Realistic Layout

Creating a professional Jewelry Shop 3D Layout is a clear, structured process. Whether you work with a design firm or try it yourself, following these steps will turn your initial idea into a detailed, realistic plan. As experts in this field, we guide our clients through this exact process. This ensures a perfect result.
Step 1: Discovery & Measurement
This is the foundation. First, you need accurate measurements of your space. This includes the floor plan, ceiling height, and exact locations of doors, windows, support columns, and electrical outlets.
Next, we define your vision. Who is your target customer? What is your brand identity—modern and minimal, or classic and fancy? What is your budget? Answering these questions is the first and most important part of your jewelry store design.
Step 2: 2D Space Planning
Before building in 3D, we start with a simple 2D plan. Think of this as a bubble diagram. We sketch out the main functional zones:
* Entrance & Decompression Zone
* Main Display Areas
* Checkout Counter
* Consultation Nook
* Back Office & Storage
* Security Points
This step ensures the logical flow of the store is perfect. We figure out the customer’s journey before we even think about materials or colors. This is a key part of developing a functional Jewelry Shop 3D Layout.
Step 3: Building the 3D Model
Now, we take the 2D plan and build it up into a basic 3D model. This is where the walls go up. You start to get a real sense of the space.
We place the primary fixtures, like the main jewelry showcase and wall displays. The goal here is to test the scale and flow from a human perspective. Do the aisles feel wide enough? Is the main counter the right height? This is where a 3D view becomes invaluable.
Step 4: Detailing – Materials, Lighting, and Textures
This step brings your Jewelry Shop 3D Layout to life. We apply the finishes you’ve chosen: wood grains, marble textures, metal accents, and paint colors. You can see how different materials look next to each other.
Lighting is the most critical element. We model the complete lighting scheme:
* Ambient lighting for overall brightness.
* Task lighting inside the display cabinets to make gems sparkle.
* Accent lighting to highlight feature pieces or your brand logo.
This is where experience matters. Working with a professional jewelry store design company is a huge advantage. They understand how light works with different materials to create the perfect luxurious atmosphere.

Step 5: Rendering and Final Changes
The final step is rendering. This process creates realistic images of your 3D model from different angles. These images look like real photographs of the finished store.
You can see exactly how your shop will look when it’s done. This is your chance to make final tweaks. Maybe you want to change a paint color or adjust the position of a display. Seeing a high-quality Still shot jewelry rendering ensures there are no surprises on opening day.
Key Elements to Perfect in Your 3D Layout
A great Jewelry Shop 3D Layout is more than just a floor plan. It includes every detail that contributes to the customer experience, security, and brand identity. Use this checklist to ensure your 3D model is complete and effective.
| Element | Key Considerations for Small Shops |
|---|---|
| Display Cases | Use frameless glass to reduce visual weight and make the space feel open. All cases must have integrated LED lighting. Consider pedestal or wall-mounted displays to save floor space. A good jewelry showcase manufacturer can provide custom solutions for tight spaces. |
| Lighting Scheme | Layered lighting is essential. You need Ambient (general room light), Task (focused light inside cases), and Accent (spotlights on key pieces). Use high CRI (Color Rendering Index) LEDs of 90+ to show the true color of metals and gems. |
| Color & Material Palette | Lighter colors and reflective surfaces make a space feel larger and brighter. Use mirrors strategically to create an illusion of depth. Stick to a simple, cohesive palette of 2-3 main materials to avoid a cluttered or busy look. |
| Customer Flow & Aisles | Ensure aisles are at least 36-48 inches (90-120 cm) wide for comfortable movement, including for wheelchairs. The layout should guide customers on a natural, circular path through the store, with no dead ends. |
| Branding & Signage | Your 3D layout should plan exactly where your logo will be placed for maximum impact. A feature wall behind the checkout counter is a great place for branding. Visualize the brand experience from the moment a customer looks in the window. |
| Security Features | Plan the placement of security cameras in your 3D model to ensure full coverage. Don’t make the space feel intimidating. High-value items should be in cases that are highly secure but also highly visible to staff at all times. Plan for the location of a safe. |
| Storage Solutions | In a small shop, clutter is the enemy. Integrate hidden storage into your display counters, wall units, and back-office design. Pull-out drawers and concealed cabinets are essential for keeping the sales floor clean. |
Choosing Your Path: DIY vs. Hiring Professionals
Once you decide to create a Jewelry Shop 3D Layout, you have two main options. You can do it yourself using software, or hire a professional design firm. Both have their pros and cons. The right choice depends on your budget, timeline, and skill level.
The DIY Route: Software Options
You can create your own 3D model using various software programs.
- Pros: The biggest advantage is the lower initial cost. You also have complete creative control over every detail of the design.
- Cons: These programs have a steep learning curve and can be very time-consuming. Without experience in retail design, your layout may lack the professional polish. It may also lack the technical knowledge needed for lighting and customer flow.
- Examples: Software like SketchUp is popular for general 3D modeling. More specialized tools like 3D jewelry CAD software show the level of complexity involved at a professional level.
The Professional Route: Design Firms
Hiring a firm that specializes in retail design offers many benefits.
- Pros: You gain access to years of industry knowledge. Professionals understand the details of jewelry lighting, security requirements, and the best materials for a luxury feel. They save you time and deliver a highly effective, polished result.
- Cons: This option requires a higher upfront investment.
- When to choose: If you want to guarantee the best possible return on your investment and create a truly competitive retail space, hiring a professional is the best path. Many companies, like us at Ouyee Display, offer a seamless process by integrating the design and manufacturing of your fixtures.
A professional Jewelry Shop 3D Layout is an investment in your business’s future. It ensures your store is beautiful, functional, and profitable from day one.
FAQ: Your Questions on Jewelry Shop 3D Layouts Answered
Here are answers to some common questions about creating a 3D layout for a jewelry store.
1. How much does a professional jewelry shop 3D layout cost?
The cost can vary a lot. It depends on the size of your store, how complex the design is, and how much detail you need. It might range from a few hundred to several thousand dollars. Think of this cost as insurance against much more expensive construction mistakes.
2. What is the most important element in a small jewelry shop design?
Lighting. Without a doubt, a proper, layered lighting scheme is the most critical element. Good lighting makes a small space feel more open and luxurious. Most importantly, it is essential for making the diamonds, gems, and metals sparkle and look their absolute best.
3. How long does it take to get a 3D layout diagram?
For a small shop, the entire design process usually takes about 1 to 3 weeks. This timeline goes from the first meeting to the final, realistic images. The exact time depends on the design’s complexity and how many changes are made along the way.
4. Can I use a 3D layout for a kiosk or a shop-in-shop?
Yes, absolutely. A Jewelry Shop 3D Layout is even more important for a kiosk. In such a small, defined space, every single inch must be perfectly planned. The layout must optimize display, transaction, security, and storage in a very tight footprint.
5. What file format will I receive for my 3D layout?
Typically, you will get high-resolution image files (like JPG or PNG) of the final rendered views from different angles. Depending on your agreement with the designer, you might also receive the source model file (e.g., a SketchUp or 3ds Max file) and technical drawings in a PDF format for your contractors.


")


